Let’s see how to split the data into multiple columns. This is also part of data cleaning. Sometimes your data are in one single column, and you need to divide it into multiple adjacent columns for applying Sort, Filter or Pivot table.
All the information is in one single column, but you need to separate it. In our earlier example, we have applied “Delimited” technique. However, this time, we will apply “Fixed width” strategy of Text to Columns.

Observation:
From the above data, you can understand that there are four pieces of information in a single cell i.e. Account No., Item No., Check No., and Description.
Our aim is to separate that one column in four different columns. Let’s see how it’s done:
Step 1: Select your data to range (from the first data cell). Go to Data tab, and then go to Text to Columns. On the “Convert Text to Columns Wizard – Step 1 of 3” box, choose Fixed Width option. Click Next.

Step 2: You will see the fixed width divider vertical line marks (called Break line) in the Data Preview window. You may need to adjust it as per your data structure.
- On double click, the brake line will be deleted
- When you click once, a new break line will be created at the point of click
- If you click an existing break line and drag it, it can be moved to the desired position
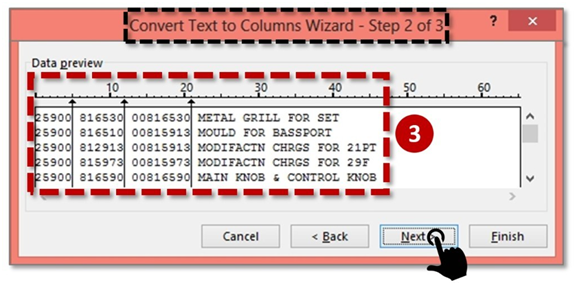
After placing appropriate break lines, click Next.
Step 3: As you click on next, you will reach Step 3 of 3 of Text to Columns wizard. You may change the destination cell so that your original data remains intact and output appears in adjoining columns’ cells.![]()
Important Note:
If you click Finish, you will observe that the 3rd column of the output has last the prefix zeroes i.e. 00816530 gets converted to 816530, thereby corrupting the data.
Step 4: To retain the prefix zeroes, you should have chosen the column from the Data Preview window of Step 3 of 3 of Text to Columns wizard. It will blacken out the column as shown in the picture below.
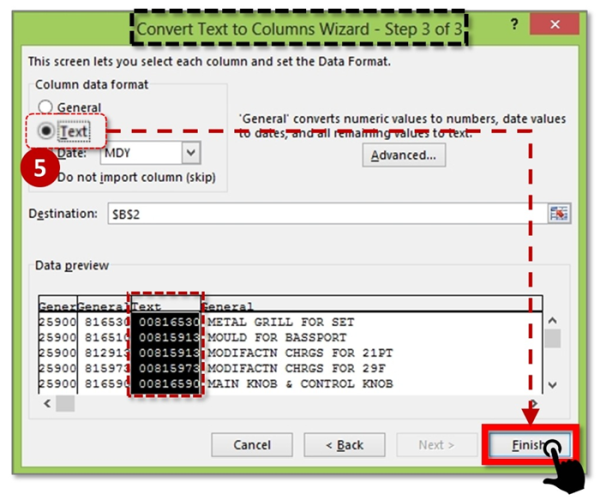
Step 5: Once the column is blackened out, choose “Text” option from the list of options [General, Text, Date and Skip]. Now if you click on Finish, you will see the zeroes are retained in the final output columns.

Recommended course to learn MS Office tools like Advanced Excel, Charts, PowerPoint Ninja, VBA Macros and Word for Finance Professionals.
Click here: /coaching/584-ms-office-bundle.asp
Canonical link: http://blog.yodalearning.com/2015/06/19/tricks-of-text-to-columns-in-ms-excel/


 CAclubindia
