
There is a inbuilt features in Busy Accounting Software to Import Voucher from Excel.
Import Vouchers From Excel
With Import Vouchers From Excel option, you can import vouchers from Excel sheet. You can specify what type of data is placed in different Excel columns and BUSY will then import data accordingly.
To use the utility, click Administration > Data Export/Import > Import Voucher From Excel option. On clicking the Import Voucher From Excel option, an Import Voucher From Excel window appears. Given here is a screenshot of Import Vouchers From Excel window.

In Import Voucher From Excel window, there are various groups and data fields. The groups and data fields are:
- Select Voucher Type
- Select Format
- Voucher Details to be Updated
- Key Fields
- Masters Creation Info
- Excel File Info.
- Import Vouchers without Error Message
Select Voucher Type
Select the voucher type whose vouchers you want to import. For example, if you want to import Sales voucher then select the Sales option.
Select Format
Select the format according to which vouchers will be imported. Next to this data field, a Configure button is given to create and configure a format. On clicking the Configure button, a Format Configuration for Import Voucher From Excel window appears. Given here is a screenshot of Format Configuration for Import Voucher From Excel window.
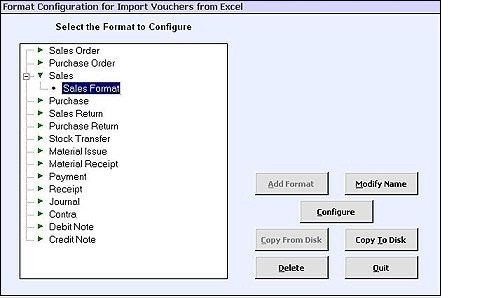
On the left hand side of Format Configuration for Import Voucher From Excel window, list of voucher types appears and on the right hand side of the window, various buttons are given. The buttons are:
- Add Format
- Modify Name
- Configure
- Copy from Disk
- Copy to Disk
- Delete
Add Format
Click this button to add a new format for the voucher type. On clicking the button, an Import Excel Format - Add window appears. In the window, specify the format name and click the Save button.
Modify Name
Click this button to modify name of the format.
Configure
To configure format for a voucher type, select the required voucher type from the left hand side of the Format Configuration for Import Vouchers from Excel window and further select the required format. After selecting the required format, click the Configure button. On clicking the Configure button, a Configuration for Importing Vouchers from Excel window appears. Given here is a screenshot of Configuration for Importing Vouchers from Excel window.
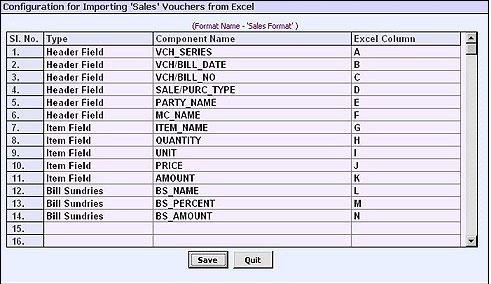
In the Configuration for Importing Vouchers from Excel window, a grid with three columns appear. The columns are:
- Type - If you have selected Inventory voucher type then three options appear in this column. The options are: Header Entries, Item Entries and Bill Sundries Entries. If you have selected an Accounting voucher type then two options: Header Entries and Body appear in this column. Select the required option from the list.
- Component Name - This column displays the list of all the fields for the type selected in the Type column. For example, if you have selected Header Entries option then all the fields that appear in the header of the voucher appears in this column. Select the required component from the list.
- Excel Column - This column displays all the Excel fields. Select the Excel field in which the data pertaining to the field selected in the Component column is placed. For example, in the Excel sheet from which data is to be imported, column A contains voucher series of the voucher. In such a case, you have to select Header Entries option from the Type column, Vch_Series option from the Component Name column and 'A' from the Excel Columns column.
Voucher Details to be Updated
Under this group following options and sub groups appear:
- Add New Voucher
- Modify Existing Voucher
- Key Fields
- Voucher Identification Key Fields
Add New Voucher
Select this option if you want to add new vouchers.
Modify Existing Voucher
Select this option if you want to modify the existing vouchers.
Key Fields
In the Key Fields group, various options as per the voucher type selected appears. These fields are mandatory fields and cannot be left blank while saving a voucher. Hence, you have to specify the default value to be stored in these fields when any of the field is blank in the Excel sheet at the time of import of vouchers. Various fields in this group are:
- Series Name - Enter the default series name.
- Date - Enter the default voucher date.
- Sale/Purchase Type - Enter the default Sale/Purchase type.
- Party Name - Enter the default party name.
- MC Name - Enter default Material Centre name.
- Target MC Name - Enter default target Material Centre name.
- Type of Cheque - Select the default type of cheque i.e. Regular or PDC.
Voucher Identification Key Fields
This group gets activated on selecting the Modify Existing Vouchers option in the Voucher Identification Key Fields group. In this group, four options appear. Select the option based on which the vouchers will be modified. The options are:
- Voucher No. - Select this option if you want to modify vouchers on the basis of voucher number.
- Voucher No. + Date - Select this option if you want to modify vouchers on the basis of voucher number and voucher date.
- Voucher No. + Series - Select this option if you want to modify vouchers on the basis of voucher number and voucher series.
- Voucher No. + Series + Date - Select this option if you want to modify vouchers on the basis of voucher number, voucher date and voucher series.
Masters Creation Info
Under this group, you can specify whether you want to create new masters automatically that are used in the vouchers and further specify the default Parent Group to be used for them. Under the group, there are various options. The options are:
- Create New Master Used in Voucher
- Specify Default Values for Addition of New Masters
Create New Master Used in Voucher
Enable this option if you want to create new masters automatically that are used in the vouchers being imported.
Specify Default Values for Addition of New Masters
Under this sub group, various data fields appear. The data fields are:
- Parent Group for Account - This data field appears if you have selected PARTY_NAME component while configuring the selected format. Specify the default Parent Group for the new Account masters.
- Parent Group for Item - This data field appears if you have selected ITEM_NAME component while configuring the selected format. Specify the default Parent Group for the new Item masters.
- Parent Group for Material Centre - This data field appears if you have selected MC_NAME component while configuring the selected format. Specify the default Parent Group for the new Material Centre masters.
- Unit - This data field appears if you have not selected the Unit component while configuring the selected format. Specify the default Unit master in this data field.
Excel File Info.
Under this group, you have to specify details about the Excel file from which you are importing the data. Various data fields that appear under this group are:
- Excel Sheet - Specify the path of the Excel file from which data is to be imported.
- Starting Row - Specify the starting row number from which data is to be imported.
- Ending Row - Specify th ending row number up to which data is to be imported.
- Sheet No. - Specify the Excel sheet number from which data is to be imported.
Import Voucher without Error message
If you enable this option then no error message will appear at the time of import of vouchers. In case any problem occurred at the time of import then default option will be considered as Skip All for Add New Vouchers and Overwrite All for Modify Existing Voucher option. Let us understand this with the help of an example. While importing vouchers, you have selected Add New Voucher option and at the time of import an error occurred. In such a case instead of showing you an error message, BUSY will automatically skip all those vouchers in which a problem had occurred.
After entering data in appropriate data fields, click the Import button to import the data. On clicking the Import button, a Start Data Import message box appears. Click the Yes button in the message box to import the data.


 CAclubindia
